DIY Refacing Guide

Do-It-Yourself Cabinet Refacing

Want to reface your kitchen cabinets yourself? Refacing your cabinets requires quite a bit of attention to detail and it helps you have some experience using tools, but you don’t have to be a master carpenter to complete this project. This guide includes everything you need, from outlining your refacing options to measuring your cabinets and installing your new doors.

DIY Cabinet Refacing Guide

Renuit provides all the materials necessary to complete a kitchen cabinet refacing project yourself, including a wide selection of cabinet doors, mouldings and peel & stick adhesive laminate. These products are available through the kitchen department at The Home Depot. Complete our online order form and take it into the store to place your order. Then, follow the instructions in this guide to complete your project.

DIY Cabinet Refacing Options

If you are considering refacing your kitchen cabinets yourself, there are several options to consider depending on your needs, time, and budget.

1. Replace the Doors Only

Simply replacing cabinet doors and drawer fronts and replacing hinges with concealed reface hinges is all that’s needed to breathe new life into some kitchens — no need to alter your cabinetry. Replacing the doors only is a good option if you don’t want to change the color or finish of your cabinet boxes.

Example: You have white cabinet boxes, but your cabinet doors & drawer fronts are damaged or outdated. You can replace just the doors & drawer fronts with a new style in white. Consider Stratus SuperMatte in London 10900 for one of our most popular styles!

2. Paint the Cabinets and Add New Doors

In many kitchens, the existing cabinets are made of high-quality materials and are in good condition, but they need a little sprucing up. Adding a fresh coat of paint to the cabinet boxes and replacing the doors and drawer fronts can yield amazing results. Painting the cabinets and adding new doors is a good option if you are using solid color for your new door selection.

Example: You’ve had enough of you raised panel cabinets in golden oak! With your heart set on new Sage SuperMatte Shaker cabinets, simply take a material swatch of Sage to the paint department for a color match. Once your boxes are painted, they’ll perfectly match your new Sage shakers.

3. Completely Reface Cabinets

For a more dramatic makeover, a complete cabinet reface may be right for you. You’ll remove all existing doors and hardware, then cover all exposed surfaces with matching peel and stick and hang the new custom matched doors. A complete cabinet reface may be a good option if you want to change the look of your cabinets with a trending engineered woodgrain.

Example: A 5-piece Prestige door in the Nizza colour has caught your eye. With a complete Reface, you’ll update the surfaces of your boxes with laminate material to match your new Nizza cabinet doors. This will complete the new, custom look of your cabinets.

How to Measure Cabinet Doors and Drawer Fronts

Before you start to measure, we recommend making a sketch of your existing kitchen that clearly shows each opening.

Number the openings starting at the upper left doors, then the lower left doors, and finally the drawer fronts, also starting on the left side (refer to Figure 1 for an example sketch). Your sketch will help you keep track of figures while you measure and easily match each new custom cabinet door and drawer front with the correct opening during installation.

How to Measure Cabinet Doors and Drawer Fronts

Other useful information to put on your sketch is the location of any doorways. If a drawer opens into the path of a doorway, note the thickness of any trim surrounding the doorway. Having this measurement will ensure the drawer front isn’t made so wide that it bumps the door trim, which would prevent the drawer from opening.

If you want to add a valance over your sink, note the measurement between the upper cabinets on each side of the sink.

Finally, measure the distance between the top of the opening on your upper cabinets, to the ceiling or the bottom of the bulkhead if one is present. This measurement will tell you if there is room for ceiling moulding.

You should also write down the location of the hinges (left or right) on each door.

Framed versus Frameless Cabinets

Before you proceed, determine whether your cabinets are framed or frameless. Framed cabinets have a frame on the front of the cabinet, while frameless do not.

Framed Cabinets
Frameless Cabinets

How to Measure Frameless Cabinets

To measure frameless cabinets, use the measurements of your existing cabinet doors and drawer fronts. Remember, you can use only concealed hinges with frameless cabinets.

How to Measure Framed Cabinets

With framed cabinets, it is important that you measure the cabinet opening and NOT existing doors and drawer fronts. For each door, start by measuring the width of the cabinet opening (as shown in Figure 2) and use the formulas below depending on the hinge type selected. Then, measure the height by measuring from the bottom of the cabinet to the top of the cabinet opening (see Figure 2). You can use either concealed or exposed hinges with framed cabinets.

How to Measure Cabinets

How to Determine Door Sizes for Framed Cabinets using Concealed Hinges

Pro Tip: To achieve a professionally installed appearance, we highly recommend replacing exposed hinges with soft close concealed hinges. Using our hinges with our accompanying reface plate makes installation much easier for either framed or frameless cabinets.

If you have framed cabinets and are using concealed hinges, determine custom door ordering width by:

If the cabinet opening is less than 20” wide, add 11/4 “ to the opening width.

If the cabinet opening is more than 20” wide, add 1” to the opening width and divide by 2. If the result is in sixteenths of an inch, round down to the nearest ⅛”. This will give you two doors for the opening.

To determine custom door height, add ½” or less to the opening height, depending on the clearance you have to the moulding above the door. See figure 2 and measuring instructions for opening height.

Door Measuring Examples for Concealed Hinges

Door Measuring Examples for Concealed Hinges

Determine hinge location (left or right side of door) and show that location on your sketch or add L or R in the location column on your order form. Remember, hinge location is only necessary if you are using concealed hinges, since these doors can be pre-drilled for you at your request.

Using glass doors? If a frame for glass or mullion bars is required, clearly note this on your order form in the appropriate box (Frame & Mullion Doors). If you are using Mullion Bars, note the number of lites required (either 1, 4, 6 or 8).

How to Determine Drawer Front Ordering Sizes

For frameless cabinets, use the widths and heights of your existing drawer fronts.

For framed cabinets, locate the door directly below the particular drawer front being measured. Use the door width as your drawer front width and use the height of your existing drawer front. If there is no door below the drawer front, such as a bank of drawers, use the width and height of your existing drawer front. If you want one long drawer front to be above the two doors such as under a sink, locate the two doors that the drawer front will be above and add the two-door width measurement together, plus ⅛”. The height will be the same as the existing drawer front.

Note: Drawer fronts can be a maximum of 40” wide for either frameless or framed cabinets.

Guide for Installing New Kitchen Cabinet Doors and Drawer Fronts

Step 1

Remove All Old Cabinet Doors and Hinges

Step 2

Remove All Old Drawer Fronts

If the drawer front is screwed to the front of the drawer box (i.e. if the drawer front was removed, the box would have a front, back and two sides) remove the drawer front and set the box aside.

If the drawer front is also the front of the drawer box (i.e. if the drawer front was removed, the box would have only a back and two sides), you should leave the drawer front on the box and trim the edges off.

Use a fine tooth saw or jigsaw to trim the lip around the old front even with the top, bottom and sides of the box. With the lip removed, the drawer should recede into the cabinet and be flush with the front of the cabinet. If the drawer box has side runners attached, it may be necessary to move them forward so the front will be flush with the cabinet when the box is fully receded. If the drawer front still does not recede fully into the cabinet, remove the old drawer front and install the new drawer front using angle brackets attached to the sides of the box and the back of the new drawer front.

Step 3

Match New Cabinet Doors and Drawer Fronts With Their Installed Location

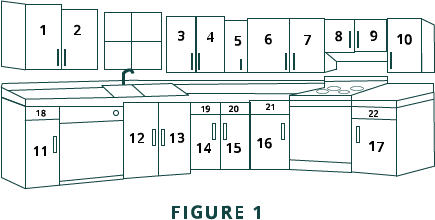
Use the numbered sketch you created.

Step 4

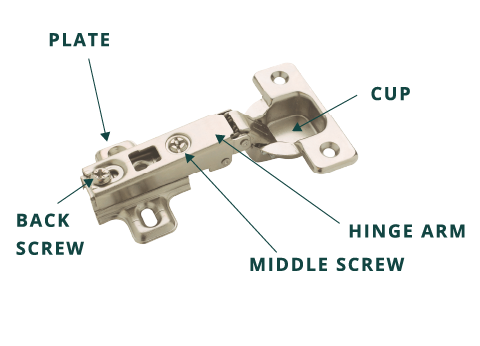
Install Concealed Hinges

Clip the hinge plate onto the hinge arm. Insert the hinge cup into the hole on the back of the door and push down on top to clamp it into place.

Step 5

Install Cabinet Doors with Concealed Hinges

We recommend two people assist with this part of the process. While one person holds the door open and flush with the bottom of the cabinet, making sure the claws on the hinge plate are snug against the front of the frame, the other person screws the plate to the side of the stile using the supplied 5/8" hinge plate screws. Make sure the screws are inserted in the middle of the holes on the hinge plate as placement there will allow adjustment up and down.

These hinges can also be adjusted to move the door from side-to-side using the screw in the middle of the hinge arm and forward-and-backward by loosening the screw on the back of the hinge arm and moving the arm forward or backward on the plate. When two doors cover a single opening, allow a 1/8" gap between the doors.

After all adjustments are completed, make sure you thoroughly tighten the back screw on the hinge arm as this is the screw that holds the door on the cabinet. Make any forward or backward adjustments by turning the back screw on the hinge arm.

Cabinet Concealed Hinge

Step 6

Drill Holes in Drawer Fronts for Handles

Drilling holes is essentially the same for drawer fronts as for doors, however the holes must be drilled before attaching the drawer front to the box. The handles or knobs are not attached until after the drawer front is fixed to the box. The only difference is that they are centered on the drawer front and not installed as a distance from the edge. Remember the handles typically have 3" between the centers of the two holes so your pencil marks should be 3" apart.

Always drill from the front surface of the drawer front through to the back.

Step 7

Install Drawer Fronts

First slide the drawer box into the opening then position the drawer front in the desired location. Then, tighten a wood screw through a handle hole (or through both handle holes if necessary) or a knob hole to temporarily hold the drawer front in place.

Adjust the position as necessary.

Remove the drawer box with the new front attached and place it face down on a flat surface, being careful not to change its position on the box. Cover your flat surface with a towel to ensure the drawer front doesn't get damaged.

From the inside, place a new screw on each side of the box, screw through the box front and into the new drawer front. On decorage (non slab) drawer fronts, make sure the permanent screws enter into the frame around the panel, not the panel itself as it is only 3/8" thick. Be sure to check all screws to ensure they are the proper length and will not puncture the front surface of the new drawer front.

Remove the temporary screws from the handle or knob hole, drill through the front of the box (3/16" bit) using the holes in the drawer front as guides. Using the 1 1/2" Handle Bolts, screw the handles or knobs into place.

How to Install False Drawer Fronts

You will probably have at least one drawer front that has no box behind it, which is referred to as a false front. The drawer front below the sink is usually a false front. Check the old drawer front to see how it was held in place and install it the same way, or secure it in place using angle brackets on each side affixed to the stile and the back of the drawer front.

Step 8

Pre-Drill Holes in Moulding

It is recommended that 1/16" hole be drilled in the Moulding where nails will be placed. This pre-drilling makes moulding installation much simpler.

Step 9

Prepare Surface for Self-Adhesive Veneer

It is recommended that you prepare all surfaces that will be covered by self-adhesive veneer because lumps will show up if the surface is not clean. Follow these steps:

  • Remove all layers of existing coatings that are loose or peeling (such as layers of paint).
  • Fill and sand the surface with a sanding block
  • Fill in old hinge screw holes with wood putty. Then, let the wood putty dry up and sand the surface smooth.
  • Wipe the surface with a clean rag or cloth to make sure that the surface is free from dust, particles and oils.

Step 10

Install Self-Adhesive Laminate

It is recommended that you prepare all surfaces that will be covered by self-adhesive veneer because lumps will show up if the surface is not clean. Follow these steps:

  • Remove the veneer from its packaging and allow it to flatten. DO NOT PEEL AWAY BACKER SHEET.
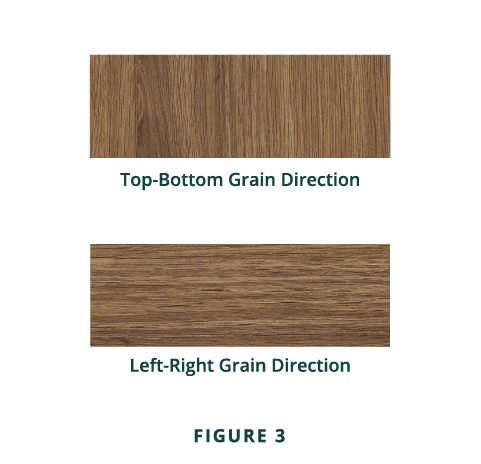
  • Measure the surface to be covered and cut the laminate into strips wider than that area you wish to cover. If you’re working with a woodgrain pattern, cover the cabinet box stiles and rails directionally to help give a more custom look (see Figure 3).
  • Peel back the longest edge of paper backing to expose a section of the adhesive. Place the exposed adhesive in the exact position desired, and lightly press it into place. Gradually remove the backing and smooth the veneer into position. Smooth out any air bubbles without applying pressure.
  • Check for an accurate fit before applying any pressure. Careful initial placement of the veneer before using any strong pressure will often allow you to completely remove the veneer and reposition without damaging it. If repositioning is needed, use a gentle but sharp lifting motion to pull free of the surface. Any detachment of the adhesive may result in adhesive “stringing” or “roping” which forms lumps under the veneer.
  • Rub the entire surface with a roller, applying with as much pressure as possible. Make sure to rub in the direction of the grain, as cross grain strokes may damage the surface. Trapped air bubbles may be flattened by splitting the wood in the direction of the grain.
  • Carefully trim off excess veneer with an edge trimmer or razor knife. Smooth any rough edges with a sanding block. Stroke the edges at a 45-degree angle.
Wood Grain Patterns

Hinge Boring Specs

Doors that require boring for hinges will have the following number of holes based on height.

hinge boring specs hole positioning

Guide to Hinge Hole Positioning:

  • 15" and under doors are 3" centers from top and bottom of door.
  • Doors 15" and over are 3 5/8" centers from top and bottom of door.
  • On larger doors where 3 or 4 holes must be drilled, the middle hole will be spaced equally in center of door.
  • All standard concealed hinge holes are drilled for a *5/8" overlay with a 35 mm cup unless otherwise specified.

Custom Drilling is available. Please provide clear instructions on your order form.

Want to Leave it to the Pros?